

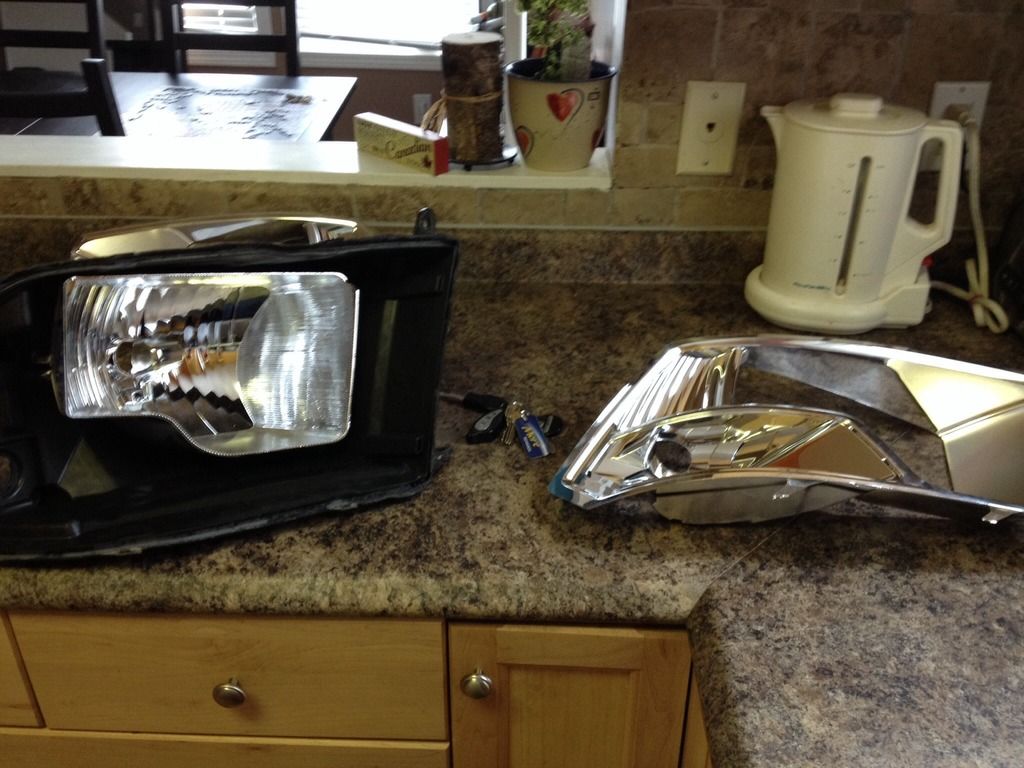
Well, after swapping in 2013+ PJ's into my 2010 RAM I had a OEM set of Dual's kicking around in the shop. Since work has been slow and this has become somewhat of an obsession. I decided today was the day I'd open the Duals up in preparation for retrofitting in a Morimoto D2S Projector. I'll preface this conversation by saying, I've never painted anything other than a wall with a paint brush let alone pick up a can of spray paint, and have never done a retrofit...
Plan is to do the dual headlights first incase I screw them up before I tackle retrofitting in the FXR into the 2013+ Pj's.
Retrofitting a Mini H1 into the Quads will be a pretty similar process, so I'd say this is pretty much bang on. There are some good videos on Youtube on how to do the quad with another brand projector but it's very similar.
Hardware:
OEM Dual headlight with 90,000KM
Morimoto Mini D2S Projector (B Stock) $60
Morimoto 5500 XB HID D2H Bulb (D2H is a D2S with amp connections) $40
DDM Ballast (for now) $30
Morimoto Butyl Rubber $15
Retrofitsource Apollo 3.0 Shroud (B-stock) for painting $15
Paint:
Krylon Colormax Primer $3.99
Krylon Colormax Satin Black $3.99
DO NOT USE AN ALL IN ONE PAINT+PRIMER. "PLASTIC" paint will not stick on our headlights either! See my lessons learned below.
Tools you'll need
Dremel, and associated bits for boring
Drill may come in handy.
Red or Gray scotch brite OR 300-600 grit sand paper
1000 grit sand paper
An oven
Flathead screw driver
Large pair of plyers
Channel locks
Summary of Steps:
I'll list them all, and then we'll go into detail on them
1. Open headlights
2. Disassemble reflector (optional)
3. Dremel to open up the H13 headlight socket (H11 if you're using quads)
4. Test fit projector
5. Hand tighten/ aim
6. Tighten and check aim
7. Adjust/Fill if needed
8. Trim shroud to fit.
9. Disassemble and prep for painting
10. 2-3 coats primer
11. 2-4 coats paint
12. Re-fit projector, hand tight. Check aim and align
13. Tighten the nut, and recheck the aim, adjust the projector some more
14. Tighten the nut more, and recheck the aim, adjust projector if needed.
15. Purge with compressed air
16. Apply butyl tape, and preheat oven
17. Reseal headlights
18. Have a beer
Lessons Learned
Okay before we get started, let me preface this tutorial with my lessons' learned so you can avoid screwing up as much as I did.
If I had to do this over again, I'd do it differently from the start up. First, aftermarket headlights are easier to open, but truth be told this was one of the easier parts of this whole ordeal. Do not be afraid of opening them. Second, the Mini-D2S 3" is a great projector, and I chose it because it can run OEM bulbs. However, it was originally designed to retrofit into an H4 headlight which has a much larger opening than the H13 bulb in the dual headlights. It will certainly be a pain in the ass to retrofit into a quad headlight. If I could start over I'd use the Morimoto Mini H1 simply because it has a 27mm shaft vs a 37mm shaft. Therefore, less chance of screwing up your alignment by taking too much of the housing and losing the base on the housing like I did. If you do decide to keep the D2S, great! Here's what I suggest you do differently.... Don't use a hole saw because it is very hard to get it to be concentric with the socket and you may be off center, or take too much. Use a dremel, and take your time. Take only as much as needed.
Next, regarding paint. There is no benefit to removing the chrome with bleach like I did. Simply scuff up the chrome with a red or gray scotchbrite pad, or steel wool. Next, do not use an all in one paint. I used krylon for plastic first after bleaching/scuffing the parts I was painting and it did not stick at all. Why? Plastic is a general term, and plastic paints only stick to very specific plastics. The plastic paints work by mixing the paint with acetone and other solvents which will melt ABS, PVC and other soft injection molded type plastics. The paint is basically a glue and becomes part of the plastic. Our headlights are made of thermoset plastics which are not soluable, nor will they reliquify with heat. Therefore, this type of paint doesn't work. Use a conventional primer and paint! It will look better, and it will be durable.
Lastly, the dual headlight housings make it very difficult to remove the reflector bucket without breaking something. If you can, just paint them in place. You can remove one simply by reaching in with a 10mm wrench and prying it up. The adjuster one you can remove simply by holding the reflector and turning the adjuster in until it pops out. The last one which is hidden is a bastard. You can't get a tool on it from the top. What I suggest instead is that you take a drill to the back of the plastic housing where the torx screws hold the pivot points in, OR heating the assembly in the oven before you pull on the reflector to remove it. If you simply pull on it with all your might when cold you will break something, trust me :/
To summarize:
If this is your first retrofit, use a Mini H1. Don't remove the reflectors, just scuff the paint, and use a conventional primer+paint. OH, and don't put any painters tape on chrome you plan on keeping (IE: turn signal), it will pull it up if you leave it on too long. Instead use plastic wrap or tape over it...see below for example.
Last minute tips:
1.Get some tack cloth to wipe your stuff down before you paint, and between coats (if it's dry). It is also good for cleaning before reassembly since it'll pick up dust/ hair, etc.
2. Handle the projector with care. Don't use any solvent like alcohol to clean it. Simply use compressed air in the bowl and lens. You can wipe the lens with a microfibre cloth. Blow clean with compressed air.
Lets get started:
First lets take a look at this Mini D2S thing so we can get an idea on how to install it, the Mini H1 is similar just smaller.:
![Image]()
Basically you install it by slipping it through your headlight socket, and then tightening the nut. You can see it has a large silicon washer that the projector sits in. This will seat right against your OEM reflector, and then you simply tighten the large nut that it comes with down until it's snug (after you've aligned it of course). Easy peasy right?
Step 1.
It is really important you don't rush or force things too much. Careful not to break the mounting tabs as you manhandle the headlight. The permaseal will never liquify on the OEM headlights like it will on an aftermarket butyl sealed headlight. It will get soft (but still tough) as you heat it but it will cool down and harden. If things become too tough, simply pop it back into the oven for another 10 minutes and keep working your way around the outside with your flathead.
Preheat the oven first, don't place it directly on the rack and ensure no part of the oven is contacting your headlight. Use a piece of cardboard or put a cloth down on a cookie sheet.
First bake 17 mins at 260. Pry the two inner tabs up and then put the screwdriver between the outter most lens and the plastic housing and slide around the headlight to break the seal and removing permaseal as you go.
Final bake 12 mins at 260, on the inside lower where the bottom tab and reinforced corner is, push the screwdriver in and pry until the headlight breaks loose. It should be tough but not overly so. It won't come right up so you may need to reheat it a couple more times to get it out from the opposite corner and work the screwdriver in there.
![Image]()
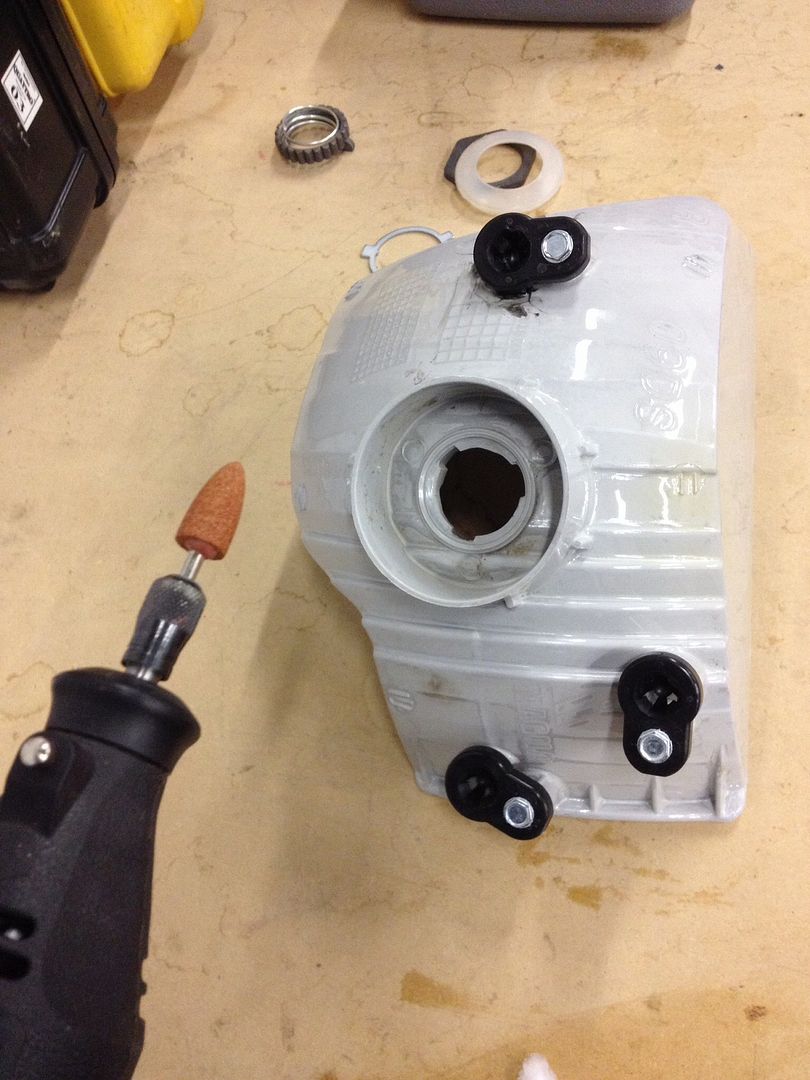
Step 2. Separating the reflector
There really is no benefit to doing this other than making it slightly easier to paint and work with. . There are little balls and sockets that hold it in at 3 points. (housing and reflector) . One is the adjuster that goes in and out. The first one you can access just above the turn signal with a 10mm wrench. I use the wrench to wedge and pry up to separate it. Next, hold the reflector with your hand and turn the adjuster clockwise to lower the adjuster until you hear a pop. Now you've got two out. One left that is hidden. You can see it just barely by looking through the back of the headlight housing, but you won't be able to get any tool in there to help you. You have a few choices to get this one out....
a. If you don't want to drill, or cut the housing, I recommend you heat the whole thing up (lets say 250deg F for 10 minutes and give it a straight pull. It should come out pretty easy with heat.
b. you can drill from the back to gain access to the torx and simply unthread it.
c. You can cut into the housing to get a wrench in there (I had to do this) or You'll have to reseal this once you're done.
![Image]()
Plan is to do the dual headlights first incase I screw them up before I tackle retrofitting in the FXR into the 2013+ Pj's.
Retrofitting a Mini H1 into the Quads will be a pretty similar process, so I'd say this is pretty much bang on. There are some good videos on Youtube on how to do the quad with another brand projector but it's very similar.
Hardware:
OEM Dual headlight with 90,000KM
Morimoto Mini D2S Projector (B Stock) $60
Morimoto 5500 XB HID D2H Bulb (D2H is a D2S with amp connections) $40
DDM Ballast (for now) $30
Morimoto Butyl Rubber $15
Retrofitsource Apollo 3.0 Shroud (B-stock) for painting $15
Paint:
Krylon Colormax Primer $3.99
Krylon Colormax Satin Black $3.99
DO NOT USE AN ALL IN ONE PAINT+PRIMER. "PLASTIC" paint will not stick on our headlights either! See my lessons learned below.
Tools you'll need
Dremel, and associated bits for boring
Drill may come in handy.
Red or Gray scotch brite OR 300-600 grit sand paper
1000 grit sand paper
An oven
Flathead screw driver
Large pair of plyers
Channel locks
Summary of Steps:
I'll list them all, and then we'll go into detail on them
1. Open headlights
2. Disassemble reflector (optional)
3. Dremel to open up the H13 headlight socket (H11 if you're using quads)
4. Test fit projector
5. Hand tighten/ aim
6. Tighten and check aim
7. Adjust/Fill if needed
8. Trim shroud to fit.
9. Disassemble and prep for painting
10. 2-3 coats primer
11. 2-4 coats paint
12. Re-fit projector, hand tight. Check aim and align
13. Tighten the nut, and recheck the aim, adjust the projector some more
14. Tighten the nut more, and recheck the aim, adjust projector if needed.
15. Purge with compressed air
16. Apply butyl tape, and preheat oven
17. Reseal headlights
18. Have a beer
Lessons Learned
Okay before we get started, let me preface this tutorial with my lessons' learned so you can avoid screwing up as much as I did.
If I had to do this over again, I'd do it differently from the start up. First, aftermarket headlights are easier to open, but truth be told this was one of the easier parts of this whole ordeal. Do not be afraid of opening them. Second, the Mini-D2S 3" is a great projector, and I chose it because it can run OEM bulbs. However, it was originally designed to retrofit into an H4 headlight which has a much larger opening than the H13 bulb in the dual headlights. It will certainly be a pain in the ass to retrofit into a quad headlight. If I could start over I'd use the Morimoto Mini H1 simply because it has a 27mm shaft vs a 37mm shaft. Therefore, less chance of screwing up your alignment by taking too much of the housing and losing the base on the housing like I did. If you do decide to keep the D2S, great! Here's what I suggest you do differently.... Don't use a hole saw because it is very hard to get it to be concentric with the socket and you may be off center, or take too much. Use a dremel, and take your time. Take only as much as needed.
Next, regarding paint. There is no benefit to removing the chrome with bleach like I did. Simply scuff up the chrome with a red or gray scotchbrite pad, or steel wool. Next, do not use an all in one paint. I used krylon for plastic first after bleaching/scuffing the parts I was painting and it did not stick at all. Why? Plastic is a general term, and plastic paints only stick to very specific plastics. The plastic paints work by mixing the paint with acetone and other solvents which will melt ABS, PVC and other soft injection molded type plastics. The paint is basically a glue and becomes part of the plastic. Our headlights are made of thermoset plastics which are not soluable, nor will they reliquify with heat. Therefore, this type of paint doesn't work. Use a conventional primer and paint! It will look better, and it will be durable.
Lastly, the dual headlight housings make it very difficult to remove the reflector bucket without breaking something. If you can, just paint them in place. You can remove one simply by reaching in with a 10mm wrench and prying it up. The adjuster one you can remove simply by holding the reflector and turning the adjuster in until it pops out. The last one which is hidden is a bastard. You can't get a tool on it from the top. What I suggest instead is that you take a drill to the back of the plastic housing where the torx screws hold the pivot points in, OR heating the assembly in the oven before you pull on the reflector to remove it. If you simply pull on it with all your might when cold you will break something, trust me :/
To summarize:
If this is your first retrofit, use a Mini H1. Don't remove the reflectors, just scuff the paint, and use a conventional primer+paint. OH, and don't put any painters tape on chrome you plan on keeping (IE: turn signal), it will pull it up if you leave it on too long. Instead use plastic wrap or tape over it...see below for example.
Last minute tips:
1.Get some tack cloth to wipe your stuff down before you paint, and between coats (if it's dry). It is also good for cleaning before reassembly since it'll pick up dust/ hair, etc.
2. Handle the projector with care. Don't use any solvent like alcohol to clean it. Simply use compressed air in the bowl and lens. You can wipe the lens with a microfibre cloth. Blow clean with compressed air.
Lets get started:
First lets take a look at this Mini D2S thing so we can get an idea on how to install it, the Mini H1 is similar just smaller.:

Basically you install it by slipping it through your headlight socket, and then tightening the nut. You can see it has a large silicon washer that the projector sits in. This will seat right against your OEM reflector, and then you simply tighten the large nut that it comes with down until it's snug (after you've aligned it of course). Easy peasy right?
Step 1.
It is really important you don't rush or force things too much. Careful not to break the mounting tabs as you manhandle the headlight. The permaseal will never liquify on the OEM headlights like it will on an aftermarket butyl sealed headlight. It will get soft (but still tough) as you heat it but it will cool down and harden. If things become too tough, simply pop it back into the oven for another 10 minutes and keep working your way around the outside with your flathead.
Preheat the oven first, don't place it directly on the rack and ensure no part of the oven is contacting your headlight. Use a piece of cardboard or put a cloth down on a cookie sheet.
First bake 17 mins at 260. Pry the two inner tabs up and then put the screwdriver between the outter most lens and the plastic housing and slide around the headlight to break the seal and removing permaseal as you go.
Final bake 12 mins at 260, on the inside lower where the bottom tab and reinforced corner is, push the screwdriver in and pry until the headlight breaks loose. It should be tough but not overly so. It won't come right up so you may need to reheat it a couple more times to get it out from the opposite corner and work the screwdriver in there.
Step 2. Separating the reflector
There really is no benefit to doing this other than making it slightly easier to paint and work with. . There are little balls and sockets that hold it in at 3 points. (housing and reflector) . One is the adjuster that goes in and out. The first one you can access just above the turn signal with a 10mm wrench. I use the wrench to wedge and pry up to separate it. Next, hold the reflector with your hand and turn the adjuster clockwise to lower the adjuster until you hear a pop. Now you've got two out. One left that is hidden. You can see it just barely by looking through the back of the headlight housing, but you won't be able to get any tool in there to help you. You have a few choices to get this one out....
a. If you don't want to drill, or cut the housing, I recommend you heat the whole thing up (lets say 250deg F for 10 minutes and give it a straight pull. It should come out pretty easy with heat.
b. you can drill from the back to gain access to the torx and simply unthread it.
c. You can cut into the housing to get a wrench in there (I had to do this) or You'll have to reseal this once you're done.
")


